Looking for a way to recover deleted photos? Were your photos lost after formatting or clearing a memory card of a mobile phone, Smartphone, hard drive or USB flash drive? Do you need a program that will not only recover digital JPEG images, but also photo files saved in RAW format?
Step-by-step recovery of deleted photos
The step-by-step wizard will help you find, recover, and save deleted photos. The program conceals the entire complexity and scrupulous process of photo recovery from the user. You will easily recover lost files by answering the wizard’s simple questions.

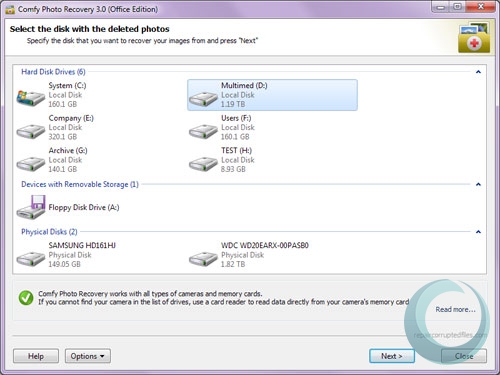
Selecting a drive with deleted images
After starting, the program will display a list of logical partitions and physical devices that are connected to the user’s system. If your images were lost as a result of deleting a logical partition or a malfunction in the partition table, you will be able to find the deleted partitions. To do so, right-click on the physical media carrier and select “Find drives” from the menu. All the partitions that are found will be automatically added to the list of drives and available for work. To eliminate the chance of harming data, you can create a virtual copy of any drive and continue recovering photos from it. To do so, right-click on the drive and select “Save drive” from the menu. After saving the drive, you can connect it using the “Monitor drive” option in the menu and continue the recovery from the virtual copy of the data. To recover photos, select the necessary drive and press “Next”.
Select a method for photo recovery
At this step you must specify the method of searching for deleted photos. The following options are available:
- Normal scanning (recommended). Using this option, you can recover not only the contents of the photo file, but also its name, the date it was created and edited, and its location on the drive.
- Deep analysis. Using this option, the program will search for deleted files by “signatures”. You won’t be able to recover the name of the file, the date it was created or edited, and its location on the drive, but the program will find many more files that can be recovered.
To continue, press “Next”.
Filter recovered files
At this step you can specify the type of the deleted file (jpg, psd, raw…). The program will scan the drive and search only for files of a specific type. You can also limit the results list by the creation date, file size, and whether or not the file was deleted. To continue, press “Next”.
The photo recovery process
The program will begin scanning the selected drive and will display small “preview” images as it finds files that can be recovered. You can double-click on an image to view its natural size. To stop scanning, you can press “Stop”, but we recommend that you wait for the task to finish. After recovery, you can select the photos that need to be saved. Here you have the options “Select all”, “Clear” and “Invert”. You can also change the mode of file list display using the following options: “Thumbnails”, “Large symbols”, “Regular symbols”, “List”, “Table” and “Tile”. To continue, press “Next”.
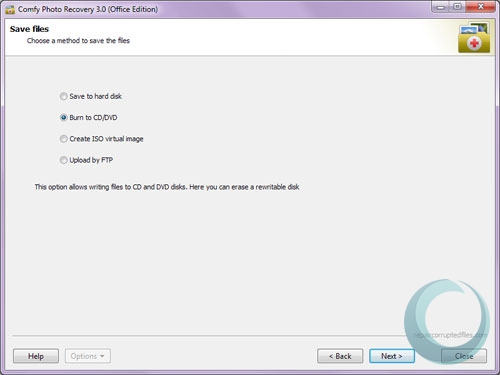
Saving recovered files
The program can save the recovered files to a folder on any drive that is connected to the user’s computer, record them to CD or DVD, create a virtual ISO copy of the files, or export digital images to a remote server using an FTP protocol. Select the necessary option and press “Next” to continue.

Saving to a hard drive
The program lets you recover not only a file’s contents, but also alternate data streams, as well as to automatically replace unknown symbols in the file name with any other symbol. Use the corresponding options for this. Specify the folder for saving the files and press “Recover”.
Recording to CD or DVD
The program will display a list of recorder drives that are connected to the computer. You can erase information from a disk by inserting it into the disk drive and pressing “Clear disk”, and then pressing “Next” to continue. At the next step you have to select the necessary options to save photos to the disk: enter the name, select the recording speed, and the disk’s file system. To create or continue a multi-session, check the option “Multi-session disk”. If a multi-session disk is inserted into the drive, you will have the option of starting a new session or selecting a path to continue an existing one. Specify the necessary options and press “Record”.
Creating a virtual ISO copy
The program lets you create a virtual copy of a CD or DVD with the recovered files. Enter the name of the disk, the file and file system, and press “Create”.
Export using FTP
The program’s FTP-client lets you export recovered images to a server. To save the files, specify the server, port, user name, password, and work mode. The program supports work through a proxy server. Check the necessary options and press “Save”.
Comfy Photo Recovery
The program will recover images in any file formats: jpeg, jpg, tiff, tif, png, bmp, psd, gif, ico, psp, wmf, as well as photos created in RAW format: 032, cr2, crw, … The utility recovers accidentally deleted photos, files that were lost after formatting memory cards of Smart Media, Compact Flash, Memory Stick, Sd, Xd, hard drives and USB flash drives.